We set a PIN while setting up our PC. The PIN lets us access the PC and do our work. However, we may sometimes see errors with the PIN. If you see the “Your PIN is no longer available due to a change in the security settings on this device” error when you try to log in on your Windows 11 PC, follow this guide.
What Causes “Your PIN is No Longer Available” Error on Windows 11
Some of the primary causes of “Your PIN is no longer available due to a change to the security settings on this device. You can set up your PIN again by going to Settings > Accounts > Sign-in options” error on Windows 11 are:
- Corruption of system files or boot-related data
- Bugs in the recently installed security updates of your Windows 11
- Multiple PINs are stored in the NGC folder
- Missing system files
Let’s see how we can fix the issue.
7 Ways to Fix “Your PIN Is No Longer Available” Error on Windows 11
Sign In With Microsoft Account and Change the PIN

When you see the “Your PIN is no longer available ” error, you can quickly sign in with your Microsoft account and change the PIN. It will allow you to access the PC instantly without going into the technicalities.
To sign in with your Microsoft Account on Windows 11 from the login screen, click the I forgot my PIN under the PIN tab. It will open an overlay window to sign in to your Microsoft account. Enter the Microsoft account credentials that you’ve added to the PC and sign in with them.
After signing in to your PC with the Microsoft account, you will be prompted to set up a new PIN. Create a PIN and use it to sign in to your PC.
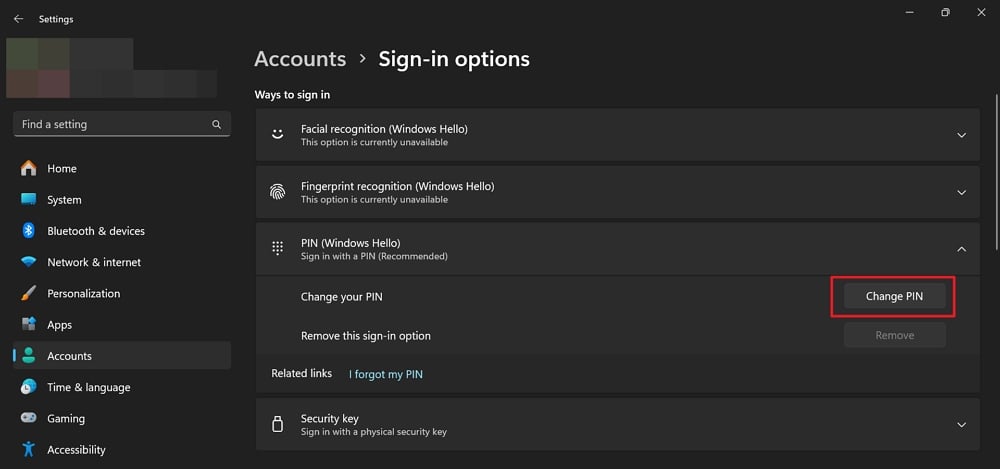
Alternatively, you can use the Sign-in Options button on the lock screen to sign in to your PC and change the PIN. To change the PIN on Windows 11 manually, open the Settings app, select the Accounts tab, and click Sign-in options. Then, expand the PIN (Windows Hello) tab by clicking on it. Click the Change PIN button and change your PIN.

Uninstall Latest Updates
If you are seeing this error only after installing the latest update on your Windows 11 PC, uninstalling the update will fix the issue. The error might have been caused by bugs in the latest update. You may see the error even if the updates are not installed properly.
To uninstall the latest updates on Windows 11,
- Open the Settings app using the Win+I keyboard shortcut or from the Start menu.
- Click the Windows updates tab and click Update history.
- On the Update history page, click Uninstall updates under Related settings.

- You will see all the updates you have installed on your PC. Click on the Uninstall button beside the latest Update for Microsoft Windows and proceed with the uninstallation.

- If you cannot access the Settings app, click the Power icon on the login screen. Hold the Shift key on your keyboard and click Restart. It will take you to the Windows Recovery Environment (WinRe).
- On the Choose an option page of Windows Recovery Environment, select Troubleshoot.
- It will show Advanced options. Click Uninstall Updates to proceed.
- Select Uninstall the latest quality update and follow the on-screen instructions to complete the process.
Uninstall Recently Installed Apps
There is a chance that a recently installed third-party app might be interfering with the processes on your Windows PC and causing issues with the PIN. It is better to uninstall any apps you recently installed on your PC from third-party sources.
To uninstall recently installed apps on Windows 11, open the Settings app, select the Apps tab, and click Installed Apps. From the list of all the installed apps on your PC, find the app you recently installed, click on the three-dot button beside it, and select Uninstall.

It will open the program’s uninstaller window. Follow the on-screen instructions to remove the app from your PC. After the uninstallation, restart your PC.
If you cannot remove the program or erase its traces from your PC, use third-party uninstallers like BCUninstaller, which can remove everything related to the program you want to remove.
Delete NGC Folder

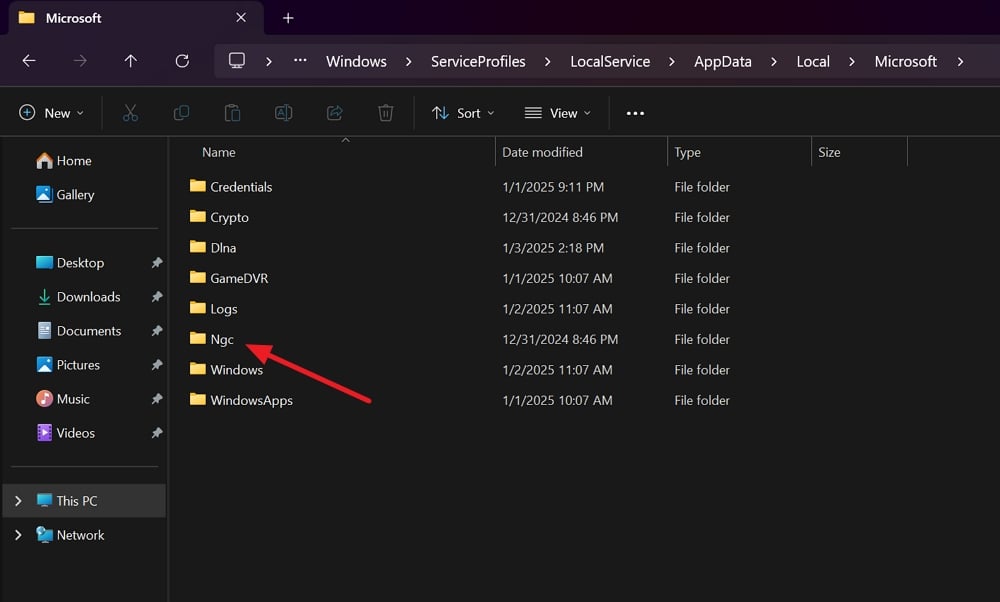
The NGC folder on Windows saves all the PIN and sign-in configurations. A corrupted file in the folder might have triggered this error. You need to delete the folder from your PC to allow Windows to create a new one. To delete the NGC folder, you need to boot into Safe Mode.
To boot into Safe Mode and delete the NGC folder from the lock screen on Windows 11,
- Click on the Power icon on the lock screen. Hold the Shift key on your keyboard and click Restart.
- It will open the Windows Recovery Environment. On the Choose an option page, select Troubleshoot.
- Select Startup Settings and click Restart.
- Press the F4 button on your keyboard to boot into Safe Mode after the restart.
- After booting into Safe Mode, open Windows Explorer using the Win+E keyboard shortcut and navigate to the following path.
C:\Windows\ServiceProfiles\LocalService\AppData\Local\Microsoft
- If you cannot enter the path, click View in the Explorer menu, hover over Show, and click Hidden items. It will show hidden folders. Now, navigate to the folder shown in the above path.
- Find the Ngc folder and delete it.
- Restart your PC and set a new PIN in the Settings app.
Enable or Clear TPM
If the Trusted Platform Module (TPM) is disabled on your PC, you might also see the error with PIN. You need to enable it to fix the error. If the TPM is enabled and you are still seeing the error, you need to clear the TPM to fix the issue. We will do it one after the other in the following way.
The options to enable TPM differ from one manufacturer to another. You need to follow the guide based on your manufacturer.
Generally, to enable TPM, you need to boot into the BIOS configuration menu while the PC is booting up using the F2, F10, etc. buttons on the keyboard. In the BIOS menu, you will see the TPM device. If you see disabled beside it, enable it with the arrow keys on your keyboard. You will see the instructions on how to change options at the bottom of the BIOS configuration menu.
Based on the manufacturer, the TPM on your PC might be named any of the following.
- Security Device
- Security Device Support
- TPM State
- AMD fTPM switch
- AMD PSP fTPM
- Intel PTT
- Intel Platform Trust Technology
If you find it disabled beside them in the BIOS settings, enable it to fix the issue with the PIN.
If the TPM is already enabled and the issue with TPM persists, you need to clear the TPM. Click on the Start button, search for Security processor troubleshooting, and open it from the results.

Then, click on the Select button and select a reason. Since you are having issues related to PIN, it is ideal to select Windows Hello showed me an error related to TPM.

It will enable the greyed-out Clear TPM button. Click on Clear TPM. If you see a UAC prompt, confirm clearing TPM by allowing it. Restart your PC, sign in with your Microsoft account, and change your PIN (Follow Method 1).
Disable Password-Less Sign in
In the earlier methods, if you did not find Sign-in options on the login screen, Microsoft has disabled Passwordless sign-in by default on Windows. It disables other options for signing in except for the PIN.
You need to disable Password-Less sign-in using the Registry Editor. If you cannot access the PC, you can enter Registry Editor on your PC from the Windows Recovery Environment.
To enter the Windows Recovery Environment, hold the Shift button on your keyboard and restart your PC on the lock screen. Select Troubleshoot and go to Advanced options on the Choose an option page. Click Command Prompt among the options.
Type Regedit in the Command Prompt window and press Enter. It will open the Registry Editor. By default, the Computer is selected in the Registry Editor. Click on HKEY_LOCAL_MACHINE.

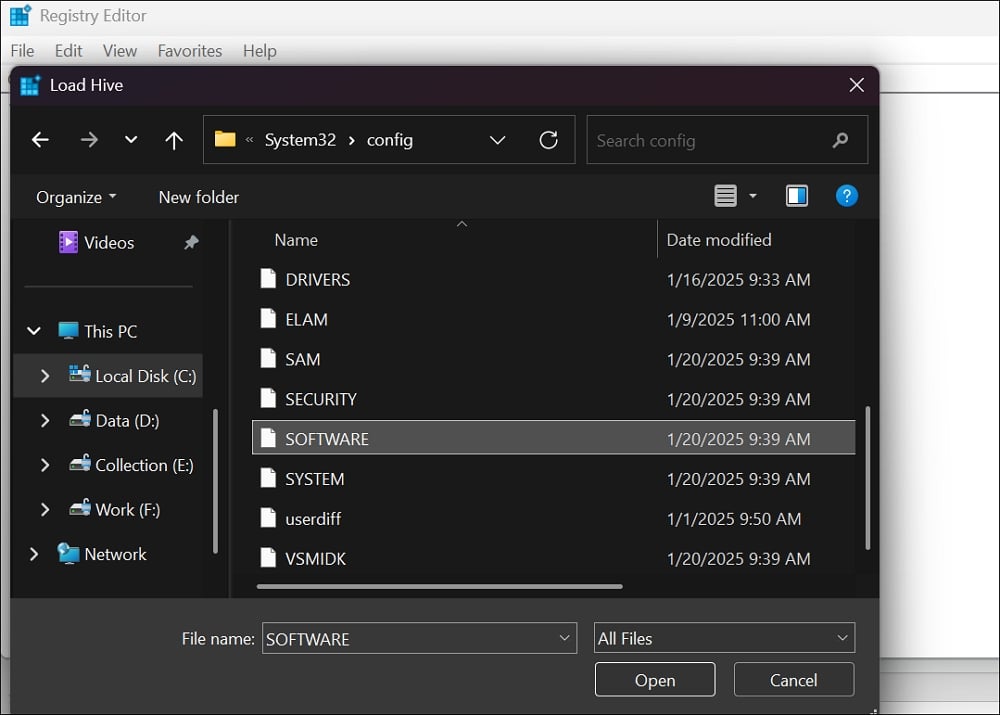
Then, click on the File in the menu bar and select Load Hive from the options.

Browse the following path on the Load Hive window and open it.
C:\Windows\System32\Config
In the Config folder, select SOFTWARE and click Open.

It will show a Load Hive window where you can enter a key name. Name it NewKey and click OK. Now, navigate to the following path.
HKEY_LOCAL_MACHINE\NewKey\Microsoft\Windows NT\CurrentVersion\PasswordLess\Device
You will see the DevicePasswordLessBuildVersion DWORD file in the path—Double-click on it to open it.
Change the Value to 0 under the Value data tab and click OK. Now, select the NewKey hive on the Registry Editor sidebar. Click on the File menu and select Unload Hive.
Now, close the Registry Editor and Command Prompt and restart your PC. After the restart, you will see Sign-in Options. Then, enter your Microsoft account password to sign in.
Reset Your PC From WinRe
If none of the above methods helped you eliminate the PIN error, you have to reset your PC using the Windows Recovery Environment. You may choose to keep your files while resetting the PC.
To reset a Windows PC from the Windows Recovery Environment,
- Choose Troubleshoot in the Choose an option page.
- Select Reset this PC on the Troubleshoot options.
- If you want to keep your files, select Keep my files. If not, select Remove everything.
- Follow the on-screen instructions to complete resetting your PC. It would take some time for the entire process to complete.
After successfully resetting your PC, it will show options for setting up your PC. You may choose to start afresh or restore from older PC versions you find while setting up. You can even set a new PIN in the process.
Keep Getting “Your PIN Is No Longer Available” Error?
When you see the “Your PIN is no longer available” error while trying to sign in to your Windows PC, various factors, including conflicting multiple PINs, corrupted system files, etc, might cause it. Sign in with your Microsoft account and change your PIN to troubleshoot the issue.
FAQs on Fixing “Your PIN Is No Longer Available” Error on Windows 11
1. Why did my Windows PIN suddenly stop working?
If the PIN you regularly use to sign in to your Windows PC is not working, it might be caused by corrupted Ngc entries, conflicting PINs on your PC, or corrupted or missing system files. Sometimes, faulty security updates might also cause the issue.
2. How do I open Windows 11 if I forgot my PIN?
If you forgot your PIN on Windows 11, you can click on I forgot my PIN on the lock screen and use your Microsoft account credentials to sign in and set a new PIN. Even if you forgot the PIN, you can use the credentials of your Microsoft account associated with your PC to help you.

![[Fix] “Your PIN Is No Longer Available” Error on Windows 11 [Fix] “Your PIN Is No Longer Available” Error on Windows 11](https://i2.wp.com/techpp.com/wp-content/uploads/2025/01/Fix-Your-PIN-Is-No-Longer-Available-Error-on-Windows-11.jpg?w=1200&resize=1200,0&ssl=1)